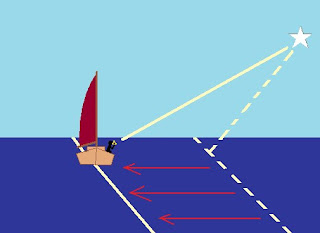
In our last lesson we demonstrated how to derive one's position on a globe, using the distances from the points on the earth directly below three celestial bodies.
However, we do not navigate on globes. We navigate on flat pieces of paper (or computer screens) which represent only the tiniest fraction of the surface of the globe. In all but the rarest of cases, the Geographic Position of the celestial body isn't even on the chart we're navigating on. So how does one go about plotting a circle of equal altitude on a chart, when the point the circle is centered on isn't on the chart, or even on the boat?
The bad news is, you can't. The good news is, you don't have to.
This particular problem, by the way, troubled navigators for decades. Marcq St Hilaire discovered one solution to this problem which we still use today.
St Hilaire's solution was actually a fairly simple one. Previous navigators had sought to be able to determine their location "cold", without any idea of where they were before they derived the location. St Hilaire realized that while this was an interesting thought-problem, it wasn't relevant to the way vessels at sea are actually navigated. In actual navigation, you always have some idea of where the vessel is, by dead reckoning (which will be covered in detail in a later lesson) if by no other means.
If you have an assumed location, even if that assumption is wildly erroneous, then instead of measuring the distance from the Geographical Position of the celestial body, you simply calculate the altitude of the body as it would be from that Assumed Position (AP), and then compare that calculated altitude with the actual altitude which was observed and measured with your sextant.
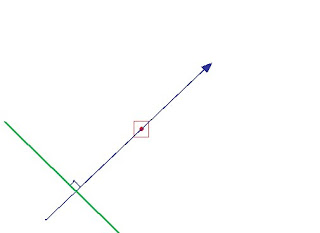
If your computed altitude of the body is a greater number than the observed altitude, you must be further away from the body by whatever amount the difference is. Remember that 1' of arc is one nautical mile. So, for example, if I compute the altitude of a body to be 46° 22', and then I observe the altitude to be 46° 08', then I have to be 14 nautical miles further away from the body than I thought I was. A mnemonic for this CGA (Coast Guard Academy), which stands for Computed Greater Away. If the Height Computed (Hc) is greater than the Height Observed (Ho) then your Line of Position (LOP) is moved away from the direction of the body, from your Assumed Position. This difference is called the Intercept, and it is from this that we get the name Azimuth Intercept Method. It is our primary method of celestial navigation. Note that the circles of equal altitude are so large that we can simply plot the segment of it which is closest to us as a straight line. Plotted on a chart or plotting sheet, our observation looks like this:
The red dot inside the red square is your Assumed Position on the chart.
The blue arrow is in the direction of the Azimuth (Zn) of the celestial body from your Assumed Position. Azimuth is just an astronomical word meaning "bearing" or "direction". In this case the azimuth is about 045° True, or roughly north-east. This is the direction you were facing when you observed the celestial body with your sextant.
The green line, which is perpendicular to the azimuth line, is however many minutes (nautical miles) distant from your Assumed Position as was the difference between your Height Computed and your Height Observed. In this case, because the computed height was greater than the observed height, it is further away from your assumed position than the celestial body. This green line is your Line of Position. You are actually somewhere along this line, as opposed your assumed position.
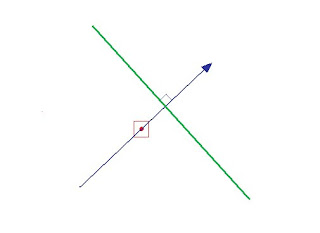
If your observed height had been greater than your computed height, it would have looked more like this:
If your Height Observed (Ho) is more than your Height Computed (Hc), your Line of Position must be closer toward the celestial body than your assumed position. Ho More Toward; HoMoTo. I've heard a number of different mnemonics for this, none of which are particularly politically correct.
Plotted on a chart or plotting sheet, this line of position looks something like this:
And you are somewhere on that line of position, rather than at your assumed position.
Now, do this with two more celestial objects, for a total of three lines of position:
Where the three green lines of position cross, labeled in this case with a black dot inside a small black circle, is your fix. This is the position of your vessel at the time you observed the three celestial bodies. If you were actually navigating, you would now update your dead reckoning track to this fix.
This plotted fix frankly looks like a mess. That's just what it is, and that's just what your fixes will look like.
In the next lesson, we will begin to see how the height and azimuth of the celestial body are computed.


No comments:
Post a Comment